Please vote for me on Babble's Top 50 Mom Craft Blogs!
Showing posts with label Craft. Show all posts

Saturday, March 19, 2011

Spring Wreath

I had a daffodil pop up and bloom in my yard this week. And according to the calendar, tomorrow is the first day of Spring! Oh, I can't wait for warmer weather! And to celebrate Spring, I made a new wreath. I was wandering around Joann's one day and the eggs just spoke to me. I think I like it :o)


Please check out all the blogs that I link with on the right sidebar of my blog...

Friday, March 11, 2011

General Conference Candy Lei Countdown & Linky Party

General Conference is just a few weeks away and I don't know about you, but I am looking forward to it :o) I think most of us adults enjoy conference, it is the kids we have to convince. Don't get me wrong, my daughter is usually pretty good. She loves the traditions we have over conference weekend, including the conference tent, special meals, and a conference basket with treats and and her conference packet.

It is all exciting the first morning, sitting in her tent with her basket and crayons all ready to listen. And then by afternoon session I am constantly telling her to be quiet so I can hear, and to sit down and stop jumping in front of the screen ;o) I know it is not as fun for kids, and I understand she is a very energetic 7 year old and sitting there that long is HARD so I just try to make it as fun as possible. And that is where all of my fun crafty blogger friends come in.

I would love to see what fun things you have planned for your kids for conference, so I can copy your brilliant ideas of course...;o) Below I am going to start a Conference Idea Linky Party that I would love for you to link your wonderful Conference crafts, recipes, and other ideas to. If you don't have a blog to link feel free to even just leave comments with your ideas because I would love to read them!

And now for one of my ideas... A Conference Candy Lei Countdown.
I personally think kids love countdowns. They are fun! With this countdown, they get to wear it around their neck and munch on a piece of candy during each talk, counting down to the very last one. Or if you like bribing your kids, they could get to eat one after each talk that they LISTEN to ;o)


You will need:
4 ft long piece of plastic wrap cut down the middle lengthwise, you will need just one half, unless you are making 2 :o)
25 pieces of candy (Over the last few conferences there have been 24-26 talks so I went in the middle and added 25 pieces of candy to my lei.)
10 inch pieces of ribbons in coordinating colors

Super easy! Cut your plastic wrap and lie it flat one the table. Line the candy up spaced a tiny bit apart about 2 inches in from the edge of the plastic wrap. Fold the plastic wrap over the candy from the edge, then roll until the candy is completely rolled up. Then take your ribbons and tie and curl between each candy. At the end you will overlap the ends of the plastic wrap over the last piece of candy and use the plastic tie to secure it, making it into a necklace.

Conference Idea Linky Party.
Go ahead and link your conference related crafts, recipes, and ideas. And please link back to me, I would greatly appreciate it :o) And that way other people can find all of our great ideas in one spot too :o)

Saturday, March 5, 2011

Bunny Hop Pop

I know Easter isn't until the END of April this year but I couldn't wait to share this cute soda pop bunny that I am making for my kids Easter baskets!

All you need is a bottle of soda pop (I used strawberry crush), plastic eyes, a pink nose, a fluffy white pom pom for the tail, chenille pipe cleaners (I found them at Micheals) for the ears, and the saying you can print out by printing the picture below. Just loop the pipe cleaner and twist it to make the ears then wrap around the top of the bottle and twist to secure, glue everything else on and you're done!

I also plan to do this with liters of pop to give away to neighbors and teachers. Maybe add a bag of popcorn with it ;o)


Please check out all the blogs that I link with on the right sidebar of my blog...

Tuesday, February 15, 2011

My Lucky Charm

At Halloween time before I started this blog I made these cute "ghosts" with my kids hand/foot prints.


Then this morning I was driving along thinking how I could do something similar for St. Patty's. It did not turn out exactly how I pictured in my mind, in part to my 9 month old refusing to open his hand flat (it might be easier with a toddler or school aged child) but I see a lucky 4 leaf clover, don't you?


I just took a blank wooden plaque I got on clearance at the craft store, drilled two holes in the top, painted it light green, then smudged white and silver paint on with a paper towel after it dried, and sanded it real quick. Then I painted his hand and put it down on the board fingers facing to the middle of the board, do this 4 times around, then paint the side of his or your hand and place it at the bottom like the stem. And you have a cute lucky charm :o)



Photobucket

she-wears-flowers.com

Please check out all of the blogs I share with on the right hand side of my blog...

St. Patty Poem

I found this saying online and kind of liked it. I cut it out with my silhouette and added it to some green paper with some coordinating shamrocks but you could print it out on some cute St. Patty paper.

May Luck be our companion
May friends stand by our side
May God bless us with happiness
May Love and Faith abide.


Please check out all of the blogs I share with on the right hand side of my blog...

Thursday, February 10, 2011

Valentine's Box- Horsey.

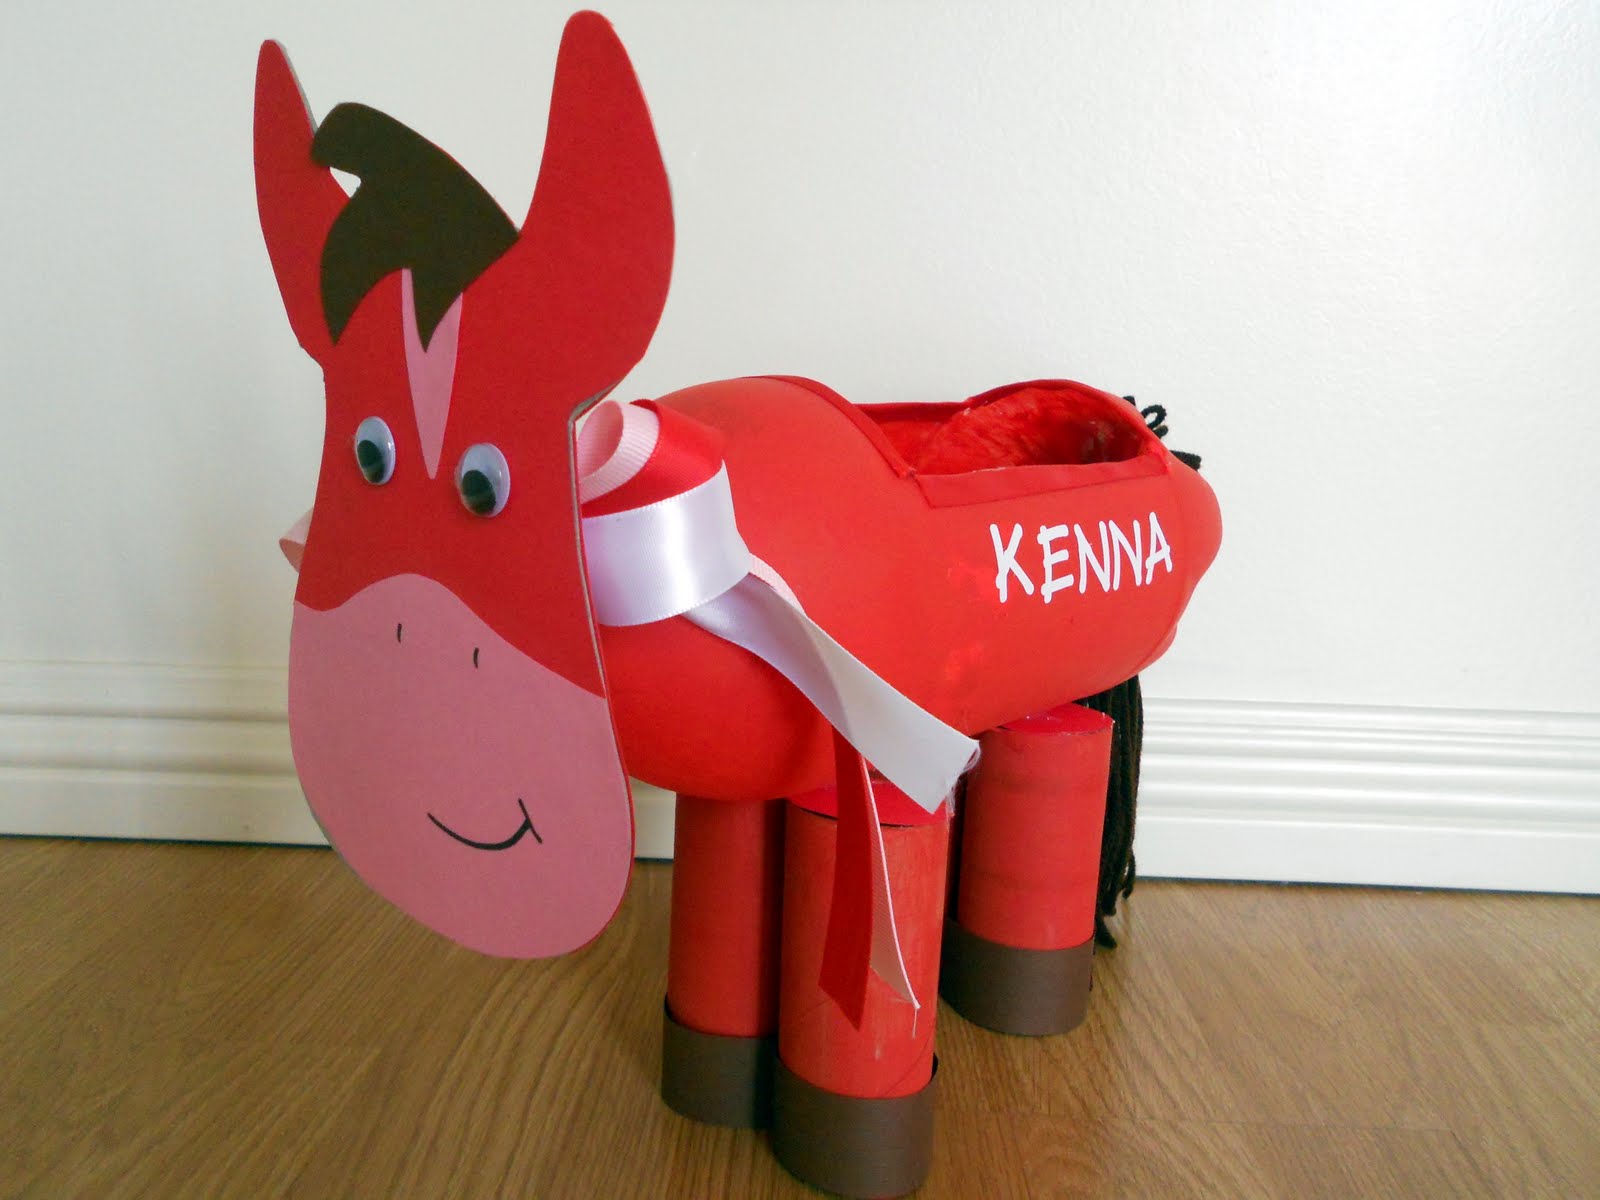
My sweet daughter needed a Valentine's box for school for next Monday and those of you that know her know she is completely overly OBSESSED with horses. Of course she said she wanted a horse, so we got creative and made her this adorable Valentine card holder.


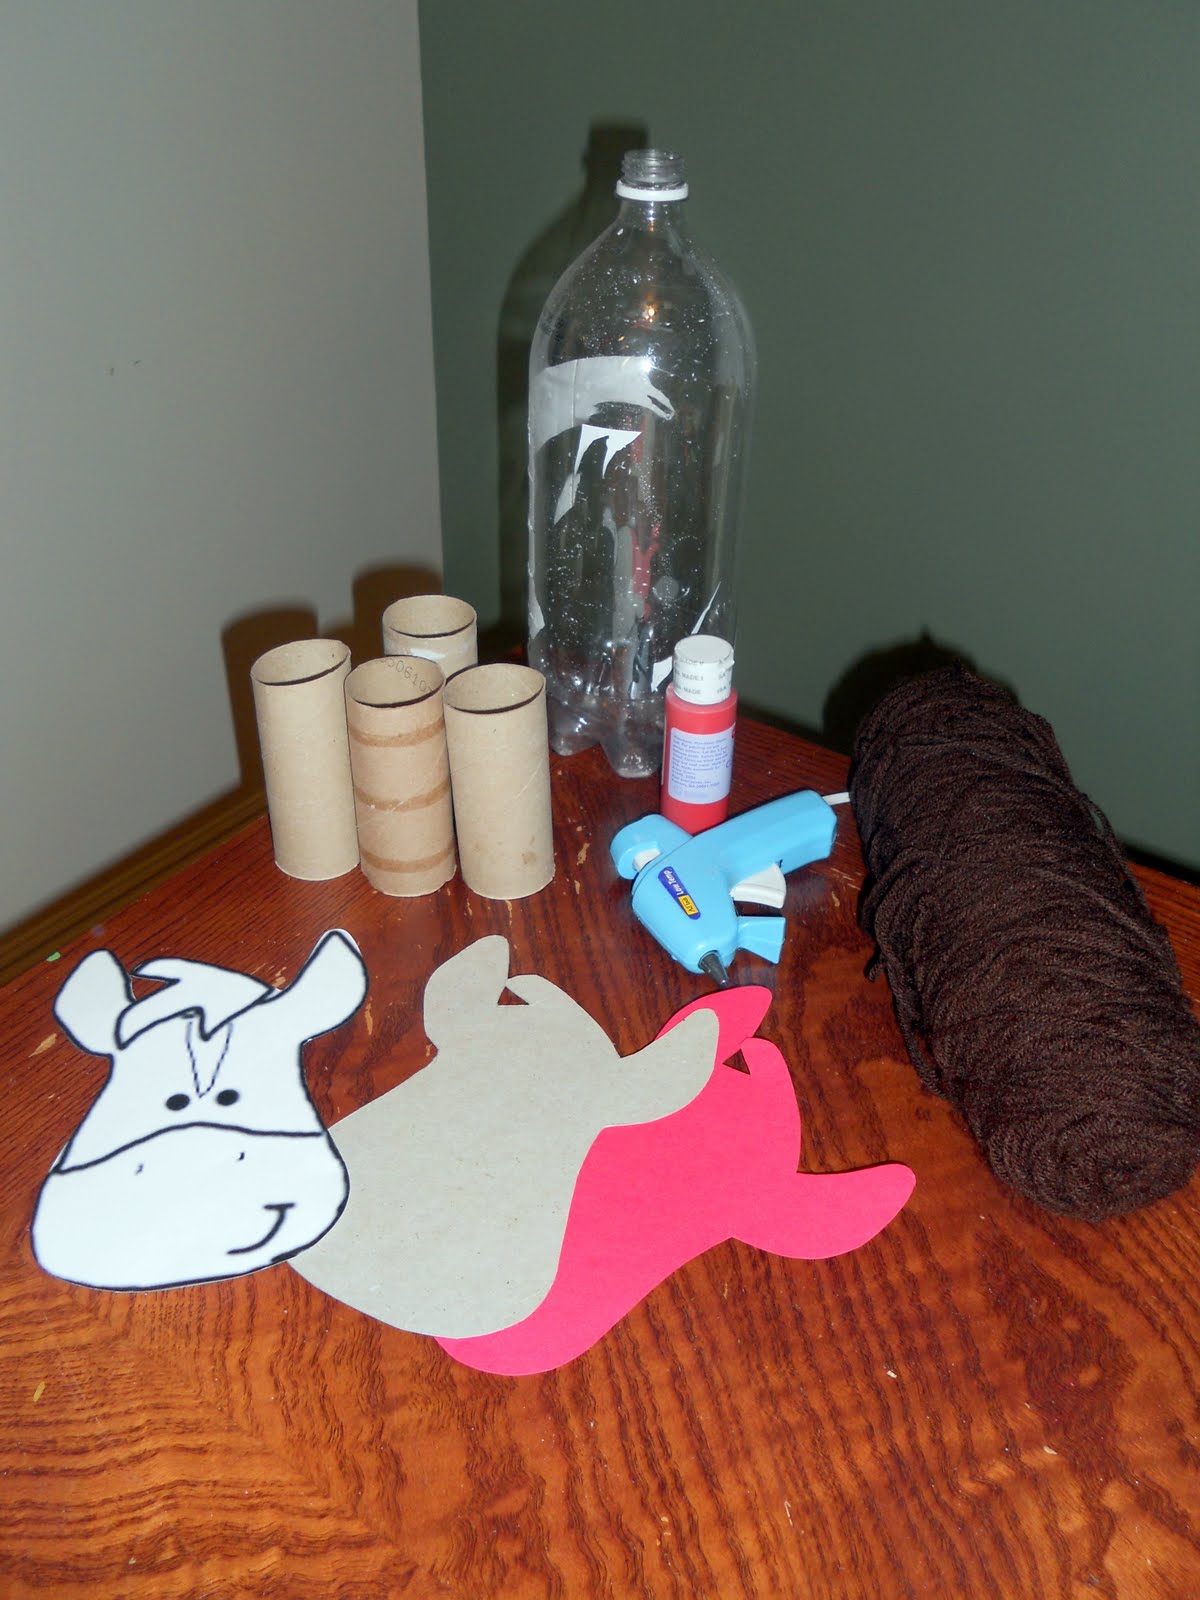
Constructed out of paper, cardboard, toilet paper rolls, soda pop bottle, ribbon, yarn and paint. Once the idea was in my head it came together really easily.
-First I cut a rectangular hole in the soda pop bottle (the horses back) for the Valentine's to go in.
-Then she painted the soda pop bottle and toilet paper holders red.
-Once they were dry we hot glued the legs together, glued red paper on top of the holes, then hot glued the soda pop bottle on top.
-If I had been thinking we would have put the paper hooves on first, I wasn't so it made it a little harder but all is well.
-Next I drew a horses head in photoshop(it kind of looks more like a cow face, oops... what can I say, I'm not exactly the best artist).I printed it out, traced around it on cardboard and a red piece of paper. Then I cut it all apart (the horse template) and traced the upper part of the head out of red, the chin out of pink, hair brown, etc... Then I pieced it back together on the cardboard with glue.
-Hot glue the head to the neck of the soda pop bottle, then to hide how ugly the neck of the bottle was we tied some ribbon into a bow.
-For the horses tail I took several pieces of yard folded in half, tied it with another small piece of yarn and then hot glued it to the bum.
-I took red ribbon and glued it around the sharp parts of the bottle where I cut the rectangular hole and lastly I cut her name out of vinyl with the silhouette.
She loves it, I love it and I am sure the kids in her class will too. Happy Valentines! Spread the Love :o)


Please check out all the blogs I share with on the right hand side of my blog...

Wednesday, February 9, 2011

52 Things I Love About You

Need a cute and thoughtful gift for your hubby for V-day? Last year I took a deck of cards and wrote 52 things that I loved about my husband, added in some pictures from online and tada! Fun, thoughtful gift to let him know all those little things that I love about him! Click on the picture to see it larger, then click down in the right hand corner to make it even larger. These are just a glimpse of the deck :O)


Please check out all the blogs I share with on the right hand side of my blog...

Saturday, February 5, 2011

Love.

I have been wanting some Valentines decorations at my house so I went to a craft night from this website with my friend and made these:


A couple of days later I was inspired to make a Valentines decoration that reflected TRUE LOVE and PURE LOVE. Something that included the Savior. Something to remind my household that Valentines is more than chocolate and flowers and candy. So I had my husband cut a 2x6 3 1/3" wide, I painted it and modge podged paper and a missionary card from the distribution center on, added some ribbon and cut the word LOVE out of vinyl with my silhouette. And I love how it turned out. I hope it makes my family reflect a little the next couple of weeks on the one who layed down his life for his friends.:


And I decided to use that same idea as my Activity Days project and talk about the pure love of Christ for our first Feb. activity:


Please check out all the blogs I share with on the right hand side of my blog...

Monday, November 29, 2010

CTR & Daughter of God Scrabble Tile Necklaces


One of the crafts I made for the achievement day girls in our ward was added to The Idea Room website. Please check it out!

Wednesday, November 17, 2010

No Sew Christmas Tree Pillow


I love how my pillows turned out! And, there was no sewing, just cutting and tying. Which is good for me because my sewing machine and I have a love/hate relationship. I am thinking I need to be on the look out for some awesome vintage buttons to add as "ornaments".

Thankful for HIM


I was rocking my sweet boy to sleep the other night when this block idea came to mind. I already had a wooden block cut and painted, I just printed out the picture (I added the wording in photoshop), then I modge podged it together with some fall colored paper.

I am so thankful for my savior and his sacrifice.