Please vote for me on Babble's Top 50 Mom Craft Blogs!

Monday, February 28, 2011

Whoopdwhoop!


Whoopdwhoop is the the new currency free market place for your crafts! You get to trade crafts with others for free! How fun and economical! It is a new site that started in January but it is really starting to take off. Here are some of my favorite things currently for trade:

Gerber Baby Boy Polka Dot Tie Onesie by Linsey


Mermaid in Bubble Bath Print by Camille Grimshaw


Brown grosgrain rosette hair clip by Elisa Fisher


crocheted owl hat by Lindsay


And I even have some things listed on there...


Go and check out Whoopdwhoop and start in the crafty trading fun!!!

Family Food Album

I am completely obsessed with this idea... I LOVE IT! A Family Food Album! At muffinsandmayhem.com you can create your own cookbook with their online application FREE! Parents and kids can type up their favorite recipes, upload photos, add personal stories, all in cookbook format. And seriously, it's FREE. What a neat idea to get kids involved in dinnertime now and how special to pass down to them later on. I started mine tonight and I honestly can't wait to get my 7 year old involved. We can add our favorite recipes, take pictures of us baking/cooking together to add to it, then we will use it to cook without throughout her years, and when it is time I will get to pass it on to her. I think this is such a very special idea :o) You could also do this with extended family, give them each the username and password and have them log in and enter in recipes and pictures to create a larger family cookbook :o)

Saturday, February 26, 2011

Bratwurst & Sour Cream Recipe

This recipe is one of my family's newest favorites, I altered it from another recipe. My husband just loves it and requests it often :o)

Bratwurst in Sour Cream

4 bratwurst sausages, sliced
1 tablespoon of butter
2 tablespoons of cold water
1 1/2 teaspoon of flour
1/4 teaspoon of salt
1/2 cup of sour cream

Melt butter in pan; add sliced up bratwurst and cook until golden brown. Add water; reduce heat and simmer, uncovered 3-5 minutes, turning bratwurst occasionally. Remove bratwurst from pan and cover to keep warm. With whisk, beat flour, salt and sour cream in skillet picking up the flavor off the bottom of the pan. Put bratwurst back in skillet, cook 5-8 minutes over low heat, stirring constantly. Serve over pasta and enjoy!


Please check out all the blogs that I link with on the right sidebar of my blog...

Giveaway Winner!

The winner of the $5 Amazon E-Gift Card is comment #12 Candace from Candace Creations! Congrats cute lady! I will be contacting you by email :o)

Friday, February 25, 2011

100 Follower Giveaway Reminder!

Don't forget that I am going to give away a $5 Amazon E-Gift Card tomorrow morning! All you have to do to enter this giveaway is 1. Be a follower and 2.Leave a comment HERE with your email so I can contact you if you win
I will stop taking entries TONIGHT Feb.25 at midnight MST and will announce the winner tomorrow (Saturday) morning.

~Thanks for following me and for all your kind comments~

Thursday, February 24, 2011

Crab & Cream Cheese Rangoons

The other night we made gyoza for dinner and I ended up with some extra pasta wrappers. So the next night I decided to get creative and make my favorite crab dip which I would normally eat with crackers, and make crab & cream cheese rangoons. My family loved them so I thought I would share the recipe with you. I also made orange chicken to go with my rangoons, however, hubby and I decided it wasn't the best. Sometimes my experiments in the kitchen work sometimes they don't :o)

Crab & Cream Cheese Rangoons

2 green onions, thinly sliced
1 tub or block of cream cheese
1 can lump crab meat, drained
1/2 cup sharp cheddar cheese, shredded
1/2 cup finely chopped red peppers
1 Tbsp. dijon mustard
1 pkg wonton wrappers

Just mix the first 6 ingredients together and spoon into wonton wrappers. Fold and then fry in saffola or canola oil. Or if you would rather make this as a dip, mix the first 6 ingredients and serve with crackers. The dip is a kraft foods recipe.


Please check out all the blogs that I link with on the right sidebar of my blog...

Monday, February 21, 2011

100 Followers & Giveaway!

Wow! I logged on last night to find this blog had hit 100 followers! It put a huge smile on my face and to celebrate I am going to give away a
$5 Amazon E-Gift Card
All you have to do to enter this giveaway is 1. Be a follower and 2.Leave a comment below with your email so I can contact you if you win :o)
I will stop taking entries on Friday night Feb.25 at midnight MST and will announce the winner Saturday morning.


~Thanks for following me and for all your kind comments~

Friday, February 18, 2011

Feb. COTM Recipe- Oreo Stuffed Chocolate Chip Cookies

Around Valentine's there were the most delicious sounding recipes rotating around the web and the Oreo Stuffed Chocolate Chip Cookie was one of them that caught my eye. I thought this would be perfect for the 2nd month of the Cookie-of-the-Month Club :o) Ohhh and they were! They are soooo delicious. Jenny @ The Picky Palate is genius! You must try them! You can grab the recipe here: Oreo Stuffed Chocolate Chip Cookies

Thursday, February 17, 2011

Lucky Us- Counting Our Blessings

I love things that help remind our family how blessed we are, so a couple of years ago for St. Patrick's Day I cut out letters saying "We Are So Lucky" and a handful of shamrocks and had our family write why we are blessed on them then we taped them up around our fireplace for the week of the holiday to remind us. I just have to tell you, I found them in a drawer the other day and was reading them and one that my daughter wrote was just so cute! It said that she was so lucky that "mom had me" awwww... Love it!


Anyway, I decided to do it again this year, and was actually hoping I could use the same letters but sadly no. The tape was all stuck together and then the paper peeled when I pulled them apart :o( So I made new ones and this time the light bulb turned on and I laminated them with contact paper. Two reasons- First, I won't have to cut them out again (yay!) and Second, the contact paper makes them wipe-able when you use a dry erase marker, we can write a new something on them every day if we want- brilliant! I can use them year after year :O)

I actually do a similar thing in the fall with leaves and you can guarantee I am going to laminate them this year, and I was thinking how cute would it be to make some Easter eggs to remember our blessings at Easter time when we are reflecting on the Savior? I am sure you will see another post about that ;o) But for now here are this years laminated shamrocks...Lucky us.


Please check out all the blogs that I link with on the right sidebar of my blog...

Wednesday, February 16, 2011

Stylish Blogger Award

I was awarded the


Thanks to Dew This, Candace Creations and Ladybird Ln for passing it along!!


So here are the rules:

1. Thank and link back to the person who awarded you this award.
2. Share 7 things about yourself.
3. Award 15 recently discovered great blogs.
4. Contact these bloggers and tell them about the award.

7 Things about Me:
1. I have 2 amazing kids who are 7 years apart
2. I am taking piano lessons for the first time in my life
3. I love to try new recipes but they don't always turn out (ask hubby about the taco casserole lol)
4. I hate laundry and dishes
5. I am soooo far behind on my children's scrapbooks that it is ridiculous
6. I love couponing and getting my groceries for atleast 50% off, usually more, and I love the free stuff you can get with coupons
7. I can't wait for spring!

15 Blogs:

1. You Craft Me Up!
2. Young Nester
3. Wendy's Activities
4. TP Craft
5. The Tattered Tag
6. The Crafty Cpa
7. The Blackberry Vine
8. Making It My Own
9. Lyndsey's Craft Spot
10. Living Craftily Ever After
11. Calico and Cupcakes
12. Life In The Thrifty Lane
13. It's All In My Head
14. Homemaking Honeys
15. Duke's And Duchesses

Tuesday, February 15, 2011

My Lucky Charm

At Halloween time before I started this blog I made these cute "ghosts" with my kids hand/foot prints.


Then this morning I was driving along thinking how I could do something similar for St. Patty's. It did not turn out exactly how I pictured in my mind, in part to my 9 month old refusing to open his hand flat (it might be easier with a toddler or school aged child) but I see a lucky 4 leaf clover, don't you?


I just took a blank wooden plaque I got on clearance at the craft store, drilled two holes in the top, painted it light green, then smudged white and silver paint on with a paper towel after it dried, and sanded it real quick. Then I painted his hand and put it down on the board fingers facing to the middle of the board, do this 4 times around, then paint the side of his or your hand and place it at the bottom like the stem. And you have a cute lucky charm :o)


Photobucket

she-wears-flowers.com

Please check out all of the blogs I share with on the right hand side of my blog...

St. Patty Poem

I found this saying online and kind of liked it. I cut it out with my silhouette and added it to some green paper with some coordinating shamrocks but you could print it out on some cute St. Patty paper.

May Luck be our companion
May friends stand by our side
May God bless us with happiness
May Love and Faith abide.


Please check out all of the blogs I share with on the right hand side of my blog...

Saturday, February 12, 2011

Turtle Trifle

This dessert is the super easy, delicious treat I made for my husband for our early Valentine dinner. Enjoy!

Turtle Trifle

8 oz pkg of mascarpone cheese or cream cheese, softened
1 1/2 cups whipping cream
1 1/2 tsp. vanills extract
1 (2 lb) frozen pecan pie, thawed and cut into 1 inch cubes
1/3 cup chocolate fudge topping
1/3 cup caramel topping
1/2 cup chopped pecans, toasted

-Beat mascarpone cheese, whipping cream, and vanilla extract in a large bowl at medium speed with an electric stand mixer, using the whisk attachment, 2 to 3 minutes until smooth and firm.
-Place half of pie cubes in bottom of a trifle dish or clear bowl. Spread half of whipped cream mixture over pie cubes. Drizzle with half each of chocolate fudge topping and caramel topping. Sprinkle with half of chopped pecans. Repeat layers.
-Cover and chill at least 1 hour or up to 8 hours.


Please check out all the blogs I share with on the right hand side of my blog...

Thursday, February 10, 2011

Valentine's Box- Horsey.

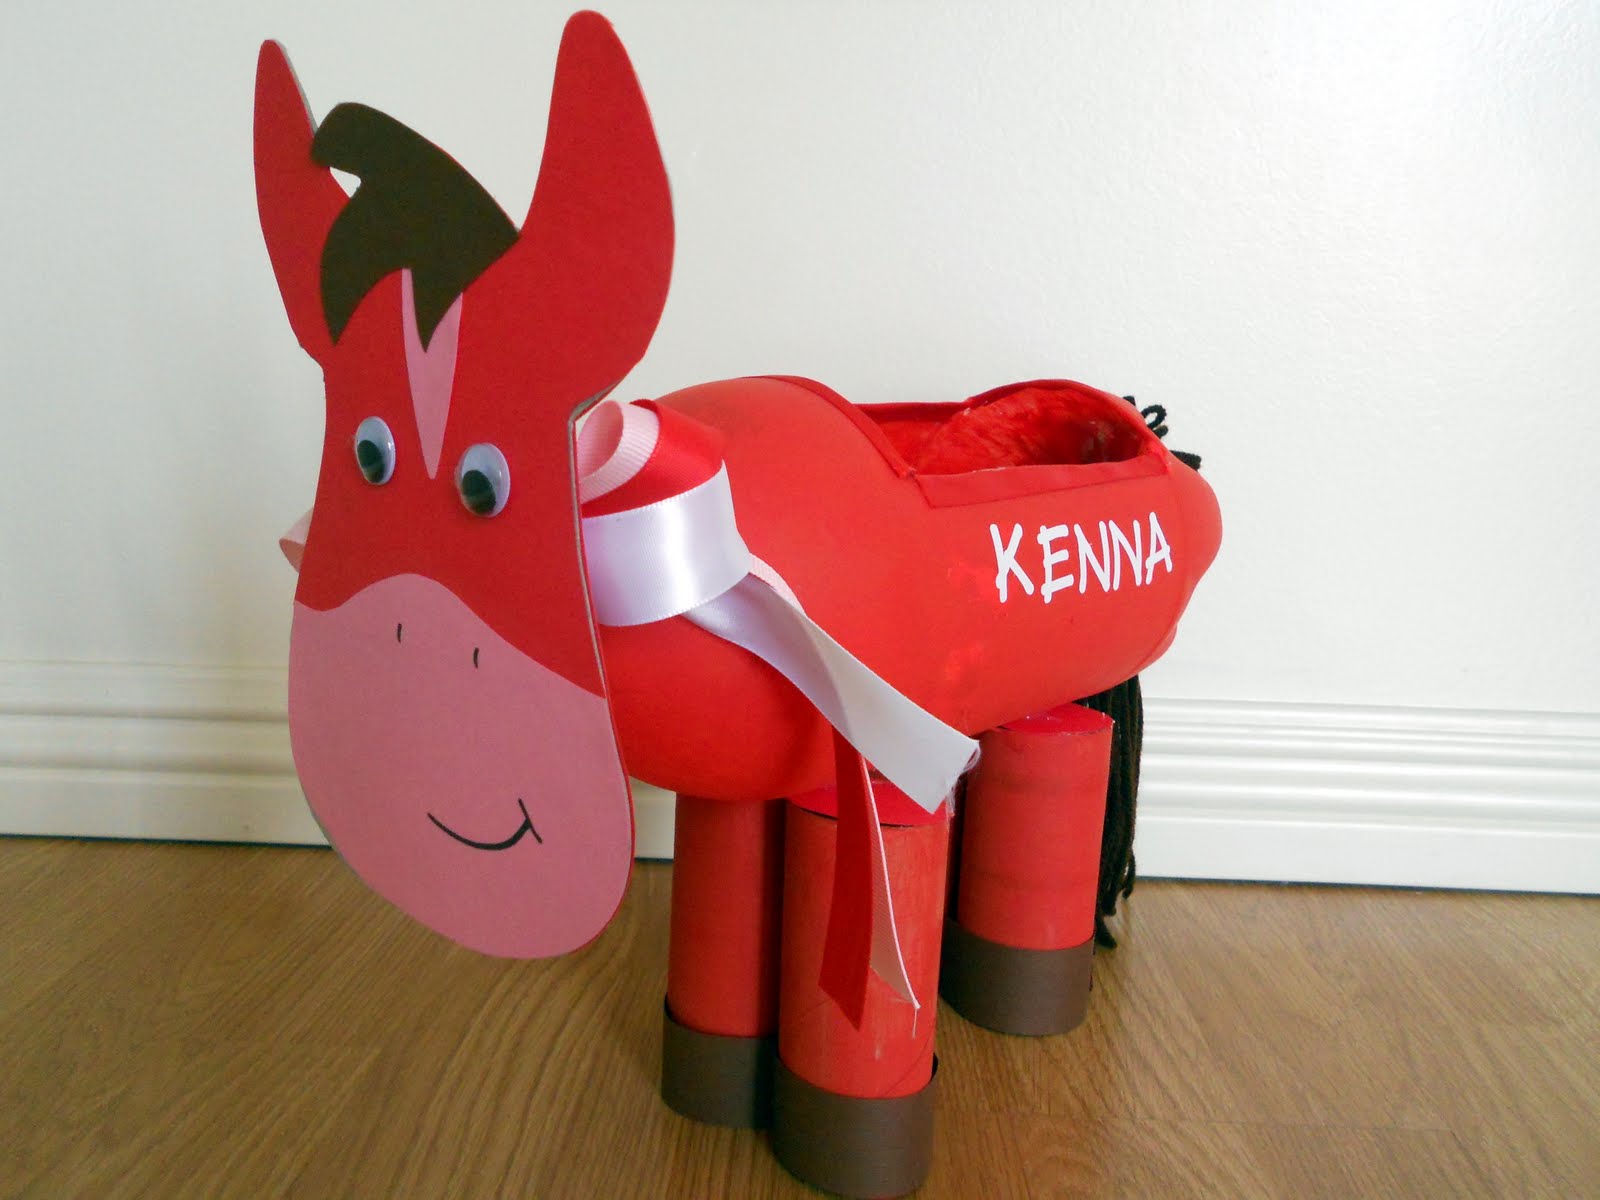
My sweet daughter needed a Valentine's box for school for next Monday and those of you that know her know she is completely overly OBSESSED with horses. Of course she said she wanted a horse, so we got creative and made her this adorable Valentine card holder.


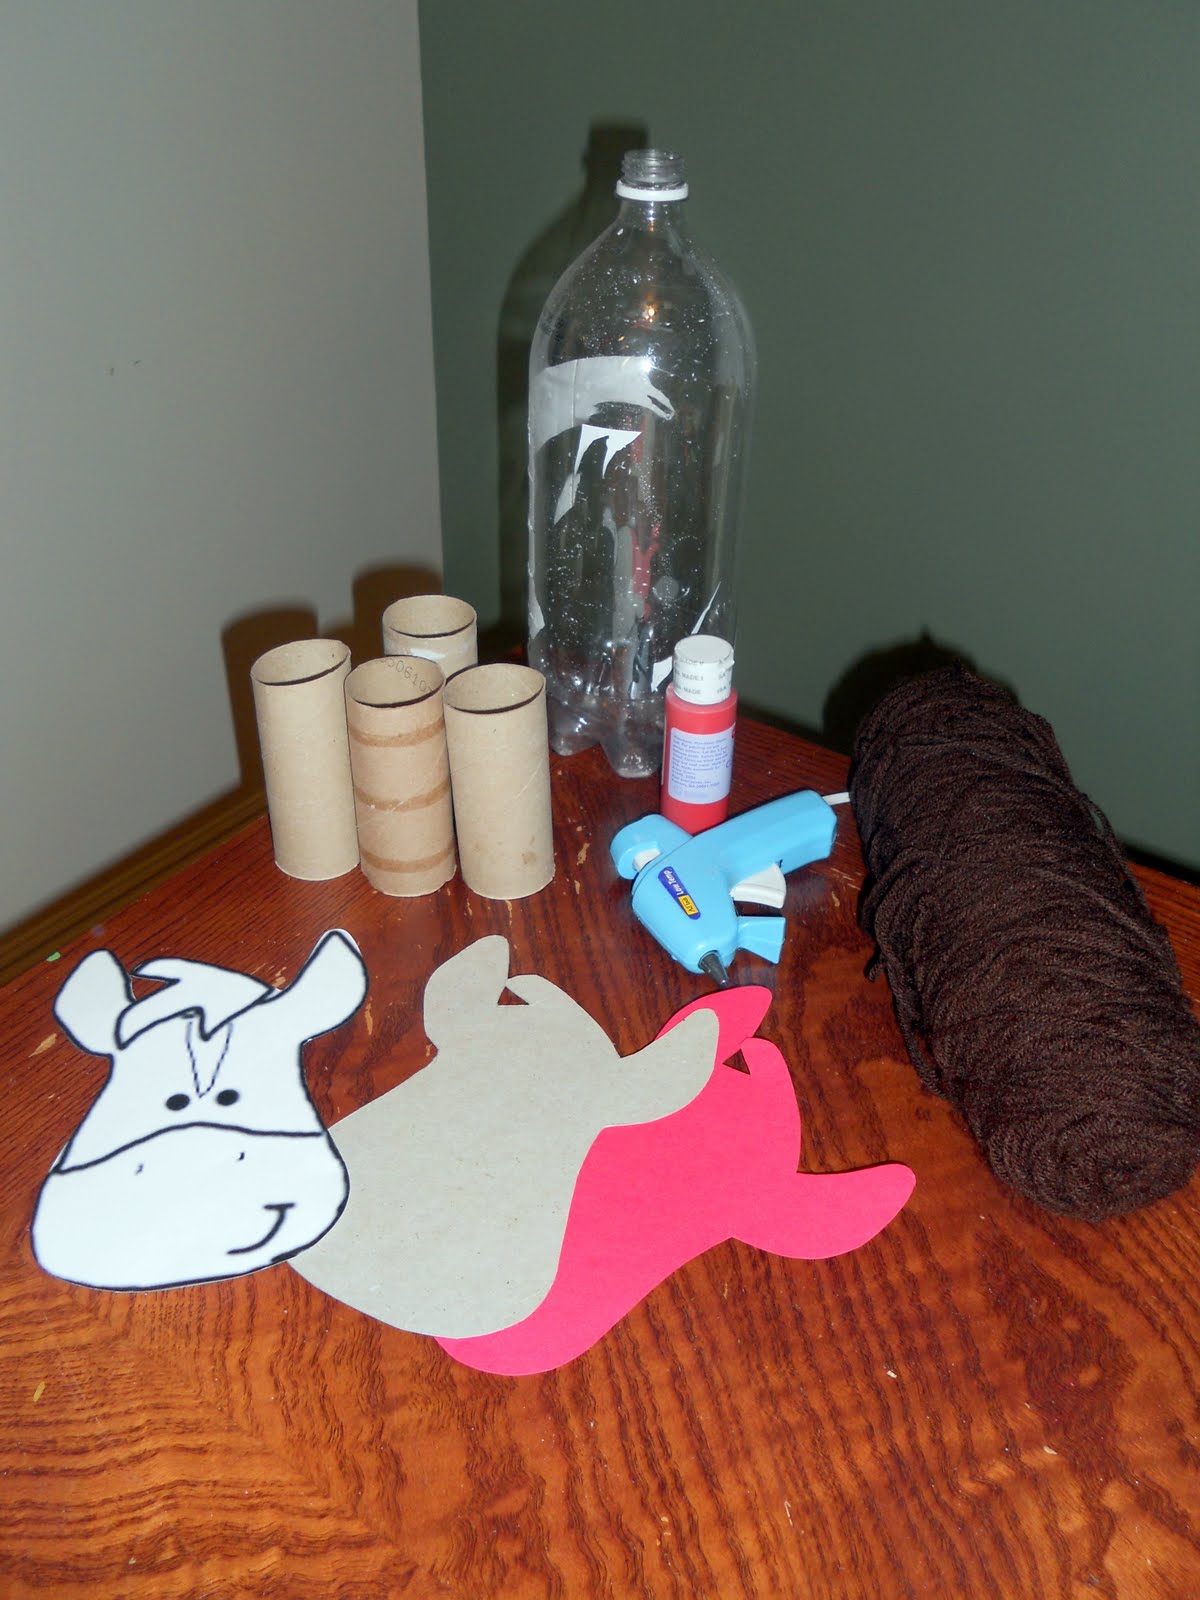
Constructed out of paper, cardboard, toilet paper rolls, soda pop bottle, ribbon, yarn and paint. Once the idea was in my head it came together really easily.
-First I cut a rectangular hole in the soda pop bottle (the horses back) for the Valentine's to go in.
-Then she painted the soda pop bottle and toilet paper holders red.
-Once they were dry we hot glued the legs together, glued red paper on top of the holes, then hot glued the soda pop bottle on top.
-If I had been thinking we would have put the paper hooves on first, I wasn't so it made it a little harder but all is well.
-Next I drew a horses head in photoshop(it kind of looks more like a cow face, oops... what can I say, I'm not exactly the best artist).I printed it out, traced around it on cardboard and a red piece of paper. Then I cut it all apart (the horse template) and traced the upper part of the head out of red, the chin out of pink, hair brown, etc... Then I pieced it back together on the cardboard with glue.
-Hot glue the head to the neck of the soda pop bottle, then to hide how ugly the neck of the bottle was we tied some ribbon into a bow.
-For the horses tail I took several pieces of yard folded in half, tied it with another small piece of yarn and then hot glued it to the bum.
-I took red ribbon and glued it around the sharp parts of the bottle where I cut the rectangular hole and lastly I cut her name out of vinyl with the silhouette.
She loves it, I love it and I am sure the kids in her class will too. Happy Valentines! Spread the Love :o)


Please check out all the blogs I share with on the right hand side of my blog...

Wednesday, February 9, 2011

52 Things I Love About You

Need a cute and thoughtful gift for your hubby for V-day? Last year I took a deck of cards and wrote 52 things that I loved about my husband, added in some pictures from online and tada! Fun, thoughtful gift to let him know all those little things that I love about him! Click on the picture to see it larger, then click down in the right hand corner to make it even larger. These are just a glimpse of the deck :O)


Please check out all the blogs I share with on the right hand side of my blog...

Tuesday, February 8, 2011

Jan. COTM Reipe- Banana Cake Cookies

I love trying new recipes. Last month I went looking for a Banana Cookie recipe but didn't love the one I tried offline so I converted my grandmothers zucchini/banana (it can be used for either) bread recipe into a cookie recipe and LOVE how they turned out. Especially with cream cheese frosting- EVERYTHING needs cream cheese frosting on it! Anywhoo- I thought I would share. This is the recipe that I used for the first month of the Cookie-of-the-Month Club :o)

Banana Cake Cookies

Recipe yields 3 dozen cookies
Preheat oven to 350 degrees

1/2 C shortening
1 C sugar
2 eggs
1 C mashed bananas
1 tsp. vanilla extract
2 C all purpose flour
2 tsp. baking powder
1/2 tsp. baking soda
1/2 tsp. salt
1 1/2 tsp. cinnamon
1/2 C chopped pecans (optional)

Cream shortening & sugar. Add eggs, banana & vanilla, beat well. Sift together flour, baking powder, baking soda, salt & spices. Add to creamed mixture, mix well. Stir in pecans if desired.
Drop dough by rounded spoonfuls 2 inches apart onto greased cookie sheet. Bake for 10-11 min. Remove to wire rack to cool. Then frost with cream cheese frosting of your choice, I chose to melt mine in the microwave and then drip into center of cookie.... ENJOY!


Please check out all the blogs I share with on the right hand side of my blog...

Saturday, February 5, 2011

Reading.

Not feeling well today so I am curling up on the couch with a book and blanket. I just wanted to share a paragraph from the book I'm reading. To The Rescue, the biography of President Thomas S. Monson.

"When you have sampled much and wandered far and have seen how fleeting and sometimes superficial a lot of the world is, our gratitude grows for the privilege of being part of something we can count on- home and family and the loyalty of loved ones. We come to know what it means to be bound together by duty, by respect, by belonging. We learn that nothing can fully take the place of the blessed relationship of family life."

Love.

I have been wanting some Valentines decorations at my house so I went to a craft night from this website with my friend and made these:


A couple of days later I was inspired to make a Valentines decoration that reflected TRUE LOVE and PURE LOVE. Something that included the Savior. Something to remind my household that Valentines is more than chocolate and flowers and candy. So I had my husband cut a 2x6 3 1/3" wide, I painted it and modge podged paper and a missionary card from the distribution center on, added some ribbon and cut the word LOVE out of vinyl with my silhouette. And I love how it turned out. I hope it makes my family reflect a little the next couple of weeks on the one who layed down his life for his friends.:


And I decided to use that same idea as my Activity Days project and talk about the pure love of Christ for our first Feb. activity:


Please check out all the blogs I share with on the right hand side of my blog...

Activity Days Welcome.

I love my Activity Days calling. First off I love that its twice a month, and Second I LOVE that it allows me to use my creative side and do cute stuff :o) This year we have 12 new girls coming into Activity Days (including my sweet daughter which I am excited about) which will bump us up to a total of 31 girls ages 8-11!!! And the majority of them are active. We have 4 leaders and break them up by ages. I am in charge of the 8-9 year olds along with another leader. To welcome in all of the new 8 year olds this year I made up welcome cans for them and thought I would share.
I took infant formula cans and sent them through the dishwasher, then covered them with wrapping paper. Inside I put a faith in God book, a activity calendar, an articles of faith card, a scripture marking pencil, daughter of God stickers and a candy bar. I also printed up a letter explaining what Activity days is and letting them know how excited we are as girls and leaders that they are joining us.


Cookie of the Month Club

This year instead of giving my nieces and nephews a present or money for their birthdays I've decided to bake them cookies once a month for a whole year! I enrolled them in my own personal Cookie-Of-The-Month Club! My sweet little niece just turned three and to kick off my year long present I wrapped up a box of homemade banana cake cookies with cream cheese frosting and made a cookie card explaining to the family about their present. Check it out:


Please check out all the blogs I share with on the right hand side of my blog...